

Since 2017, WordPress is moving towards SSL which provides the encrypted connection between the browsers and the servers. According to a blog post on Google Security Blog, beginning in July 2018, the new release of Google Chrome 68, the browser will mark all the non-HTTPS sites as “not secure”. So having site is an inevitable option.
SSL certificates are not cheap. The price of it can range from a few dollars to a few hundred dollars a year. Thanks to Let’s Encrypt, casual bloggers can install free SSL certificates for their sites which will be valid for 90 days. You’ll need to renew it every 90 days to keep your site SSL-enabled.


Unfortunately, not all web hosting company provides the convenience to install the free SSL certificates via Let’s Encrypt on their chosen web hosting control panel. There are many other ways to do it but I’ve chosen ZeroSSL because it is easy to use and it is web-based. To see if your web hosting provider supports Let’s Encrypt, check out the list here.


In this guide, I’m going to show you how to install the free SSL certificate for your WordPress sites or any websites via cPanel. Before we begin, here are some of the pre-requisites of this guide.
- You own a self-hosted WordPress site or other websites that you have access to the web hosting’s control panel.
- cPanel access. The SSL installation guide is based on cPanel so it might not be applicable to you if your web hosting provides you with another type of control panel.
- Basic understanding of how SSL works.
- Basic understanding of domain names and its structures.
Step 1 – Generate Let’s Encrypt Key and CSR
In order to generate the SSL certificates for your domain, you’re required to generate a Let’s Encrypt Key and CSR (Certificate Signing Request). This is a one-time action if you’re requesting a new SSL certificate. The key and CSR can be used for renewal when your SSL certificate expired.
1. Go to the ZeroSSL Free SSL Certificate Wizard page.
2. Enter your email address (optional) and the domain name that you want to install SSL certificate. To simplify things, I would suggest generating a wildcard certificate that can be installed for your domain as well as its sub-domains. In my example, I entered .blog, *.reginafoo.blog in the Domains field.
3. Select the Accept ZeroSSL TOS and Accept Let’s Encrypt SA (pdf) checkboxes.
4. Click NEXT button to generate CSR.


5. Once the CSR is generated, click the download button to save the CSR file (domain-csr.txt) to your computer. Click NEXT button again to generate the Let’s Encrypt key.

6. Your Let’s Encrypt key is now generated. Download the file (account-key.txt) and save it to your computer. Click NEXT to proceed to Step 2.

Important Note: Please keep the CSR (domain-csr.txt) and Let’s Encrypt key file (account-key.txt) in a safe place for renewal. If you renew your SSL certificate within 60 days (at the time of writing), you don’t need to perform the domain verification process again.
Step 2 – Verifying Domain
Before generating the SSL certificate, Let’s Encrypt needs to verify the ownership of the domain. For wildcard certificate in this guide, you are required to create TXT records at your domain for the verification process. If you’re requesting SSL certificate for a single domain (which is not included in this guide), you need to have access to either FTP or SSH for the verification.


As shown in the image above, you need to create 2 TXT records at your domain to verify the ownership of your domains. In my example, I have to verify for both reginafoo.blog and *.reginafoo.blog.
1. Login to your cPanel and go to Domains > Zone Editor.
2. Click Manage on the domain name that you want to install the SSL certificate.
3. Click Add Record and add the TXT records shown on the ZeroSSL page.


4. Verify the entries after done.


5. Adding new DNS records may take time to be updated. So take a break, have a cup of coffee and come back after 15 to 20 minutes. Click the NEXT button to proceed.


Congratulations! Your free SSL certificate is now ready! Make sure you download both certificate (domain-crt.txt) and key files (domain-key.txt) and save it to your computer. You’re going to need these two files to install the SSL certificates in next step.
Step 3 – Installing SSL Certificate
Next, you’re going to install the newly generated SSL certificate for your domain. Get your certificate (domain-crt.txt) and key files (domain-key.txt) for this step.
1. Login to cPanel and go to Security > SSL/TLS.
2. At a New Certificate section, choose domain-crt.txt file and click the Upload Certificate button.


3. Go back to the previous screen, under Certificates on Server section, click Install.


4. Open the domain-key.txt file using Notepad, copy the entire content of the file and paste it into the Private Key (KEY) text area. Click Install Certificate button to proceed.


5. Verify the Manage Installed SSL Websites section and make sure your domain and sub-domains are now showing a green padlock, which means they’re SSL-enabled.


Step 4 – Verifying HTTPS of Your Site
If you have a WordPress site or another website published, you may visit your site with the https version of your site address to verify your SSL certificate.
Note: I’m using Google Chrome as the illustration so you might see a different output from my images in this step.
1. At your browser, type your site address starting with https://. In my example, I typed https://reginafoo.blog on the browser’s address bar.
2. At the address bar, you should be able to see the word Secure with the green padlock. If you click on the text, the browser will show you the extra information including the validity of your certificate.

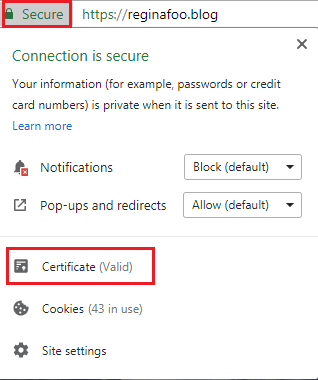
In the event that your SSL certificate is expired or invalid, you’ll see the word Not secure beside the site address.


Recap
When you reach here with expected results by following the guides, give yourself a pat on the back as you have secured your site now! In short, we have achieved these in the guide:
- Generated Let’s Encrypt key, CSR, SSL certificate and private key for your domain.
- Installed the SSL certificate for your domain in cPanel.
- Verified if your site is SSL-enabled.
If you have questions or feedback on this guide, please leave a comment and share with me. Thank you for reading this.