Step 4 – Verifying HTTPS of Your Site
If you have a WordPress site or another website published, you may visit your site with the https version of your site address to verify your SSL certificate.
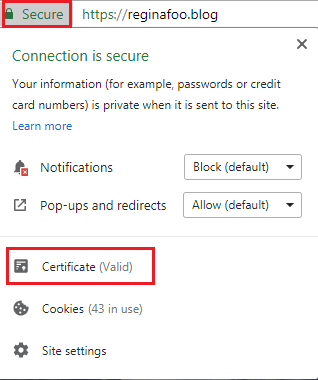
Note: I’m using Google Chrome as the illustration so you might see a different output from my images in this step.
1. At your browser, type your site address starting with https://. In my example, I typed https://reginafoo.blog on the browser’s address bar.
2. At the address bar, you should be able to see the word Secure with the green padlock. If you click on the text, the browser will show you the extra information including the validity of your certificate.
In the event that your SSL certificate is expired or invalid, you’ll see the word Not secure beside the site address.

Recap
When you reach here with expected results by following the guides, give yourself a pat on the back as you have secured your site now! In short, we have achieved these in the guide:
- Generated Let’s Encrypt key, CSR, SSL certificate and private key for your domain.
- Installed the SSL certificate for your domain in cPanel.
- Verified if your site is SSL-enabled.
If you have questions or feedback on this guide, please leave a comment and share with me. Thank you for reading this.


Leave a Reply